
The Thing Editor (F2).
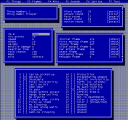
When you start dehacked, after you clear the splash screen you will be in the thing editor. This screen is where you can define the properties of any "thing" in doom. A thing can be an enemy, pillar, health pack (ie objects you can place using a level editor) and it can be objects generated in game such as plasma shots, blood splats and teleport flashes.
You navigate around the screen using the cursor keys. The up and down arrows move you up and down within a box. The left and right keys move you from one box to the next. Page up and down moves you from one screen to the next. Most of the above keys will work in the thing editor.
There is a last entry in the thing editor called the clipboard. This is only used internally by dehacked, and will not be saved in your patch, but can be used as a temporary store for information. You can copy to and from the clipboard using the c key.
Using the g "go" key will bring up a menu of the things listed by name. You can just select the one you want from the list and go to it, or if you know the dehacked thing number, you can hit g and type in the number to go to it instead.
The screen layout.
Thing information box (top left).

This displays the thing number (used internally by dehacked and reflects the order the things are found in the exe) and the thing name. The thing name can be changed by highlighting it, hitting enter and typing in your new name. Any changes here will be saved in a patch file, but as these are just names used internally by dehacked, they will not be written to the hacked EXE. When you quit and restart dehacked, these names will be lost unless you have saved a patch file and you then reload it. You can specify a name files for dehacked to automatically load on startup (see my description of setting up the ini file).
Thing properties box (middle left).

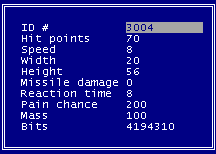
This is where you can define the main properties of a thing.
ID # This is the number doom uses to identify things. These are also the numbers that level editors use to identify things. Eg, using a type 3004 in a level editor will put a trooper in your level. In dehacked, the trooper has an ID # of 3004. Things that are spawned in game (such as blood splats) have an ID of –1.
Hit points is a measure of how tough the thing is. The measly trooper normally only has 20 whereas the cyberdemon has 4000. Have a look at the various bad guys to get a feel for how tough a monster is relative to their hit points value. Things that cannot be hit usually have 1000 hit points, but this is irrelevant (I think) as…they can not be hit.
Speed tells you haw fast the thing travels. The higher the number, the faster the thing. If a thing is a projectile, its speed value is multiplied by 65536. Don’t worry about this, however, as the calculation is done internally by dehacked.
Width is the RADIUS (not diameter) of the thing. A thing’s total width is twice the value entered here. If a thing is to fit down a corridor in a level, the corridor must be at least 1 unit wider than 2x the width value in dehacked. The smaller a thing's width, the harder it is to hit.
Height is a thing’s height :-) The taller the thing, the higher the height value and the easier it is to hit. In ye good olde days when doom had very limited height checking, things which could not be shot but blocked objects (eg pillars) blocked movement for the full height of the sector they were in. Most of the source ports have better height checking and you can now jump over or walk under things, so setting their height is a little more important.
Missile damage. A measure of how much damage a thing that is a projectile inflicts on its target when it hits. The lost soul has an entry here as it behaves like a projectile during its attack. If you are using Zdoom, you can give a monster the ability to use the a rail gun using the Zdoom specific rail gun code pointer. When doing this, you set the missile damage of the monster to reflect the amount of damage the rail gun attack will do when the monster hits you (or other monsters).
Reaction time. A measure of how ready the thing is to attack. The higher the number, the longer it will take to attack.
Pain chance. If set to 0, the monster will never stop doing whatever it was doing to go into its pain sequence, if set to 256 it will always go into pain when hit (eg lost soul).
Mass. The most obvious place you see the effect of the mass value is how far impacts and explosions throw things. The lower the number the lower the mass. Human mass is 100 (players troopers etc).
Bits. This is a number calculated by dehacked based on the bits that are checked in the bottom box on the things screen. You can enter the number manually, but using the box at the bottom is usually easier.
The sounds box (top right).

This is where you define the sounds for the things. You change the sounds by selecting the sound in the sound box and hitting enter. You then type in the number of the sound you want. You can find out sound numbers by hitting F5 and looking up the sound table and then hitting F2 to return to the thing editor. Pressing space on a highlighted sound will play the sound if you were able to set up dehacked to use your sound card. Some sounds (eg Imp, and former human wake up and death sounds) are part of a series of sounds. There are actually 3 former human and 2 Imp wake up sounds. Entering any of these sounds will mean doom uses one of them, as far as I can tell, randomly. Setting a sound to 0 means no sound will be played.
There are some additional considerations for sound mappings when using Zdoom as that port can be used to remap sounds to different names using an entry called SNDINFO. I will discuss some of the issues relating to that in the miscellaneous extra stuff section.
Alert sound. This is the sound made when a thing first spots you and wakes up.
Attack sound is the sound made during a close attack. In many cases this is not needed as the various attacks automatically have sounds associated with them, and will not change even if you set this value to something else.
Pain sound. If the thing is going through its pain sequence, this sound will be played.
Death sound is the sound the thing makes when dying.
Action sound is the sound made at various intervals when an awake thing is just wandering around (eg the chattering of the imps).
The frames box (middle right).

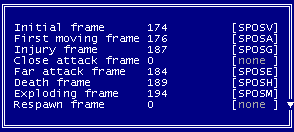
This is where you allocate the frames that give a thing its appearance and behaviour. If the thing is a simple pillar, it will be mapped to a frame that simply shows a picture of the thing, and stays on that frame. If the thing is an animated torch, it will be mapped to a frame that has a picture of the torch, an instruction on how long to show the picture before moving on to the next frame and the next frame to show. Eventually the last frame in the sequence will cycle back to the first. If the thing is more complex, like a monster, it will also be mapped to various sequences of frames. As well as showing pictures, such frames may also generate actions (such as creating an imp attack by spawning a fireball aimed at the player). From the frames box, you only have to worry about mapping the various actions to the correct first frame in the various sequences. Altering the sequences will be dealt with in the section on the frames editor.
In the frame box, highlighting a frame and pressing space shows the picture associated with that frame. The left and right cursor keys show the thing from its different angles if it has different angles to show. Pressing space again will move on to the next frame in the animation, or return you to the thing editor if it is the last frame of animation. If the animation is cyclic, press Esc to return to the thing editor.
Initial frame. If this is a simple decoration, this is the only frame that need be defined. If it is a monster, this will be the frame shown whilst the monster is waiting to wake up. This usually cycles between two frames using pictures from the walking sequence. This gives monsters their characteristic doom "jogging on the spot" look.
First moving frame. This should the first frame in a monster’s moving sequence. A monster’s walking sequence is typically 8 frames showing 4 walking frames and cycling back to the start. For a monster to move, it needs to have a speed defined in the properties box.
Injury frame. This is the first frame in a monsters pain sequence. This will usually be a short series of frames showing the thing in pain, playing the pain sound and returning to the start of the walking sequence.
Close attack frame. Defines the sequence that is used when the monster attacks something standing at close range.
Far attack frame. Defines the sequence that is used when the monster attacks something at a distance.
Some monsters (eg the Revenant) have totally different sequences for close and far attacks. Others (Imp, baron etc) use the same frames, but the frames will do different things depending on how close the target is to the attacking monster.
Death frame. The sequence played when a thing dies. If this is a monster this will typically be an animation of the monster falling down, the death sound will be played and the thing will be set to "dead body mode" so that it is no longer a solid object. The last frame of the sequence will be set to remain, or disappear after a given time, depending on the monster (eg trooper bodies stay, lost souls just vanish). For missiles, this is their explosion sequence.
Exploding frame. This is the alternative death frame or gib frame. This will usually be a picture of the monster splitting open and spreading their guts all over. The sound DSSLOP will be played and then dead body mode will be set. The explosion frames are shown when a monster is hit with great force. There must be some calculation that relates how hard a thing is hit compared to its hit point value that is used here. If you set a monsters hit points too high, it becomes impossible to "gib" it and it will never show its explosion frames regardless of what you hit it with. I don’t know if the calculation is an actual damage to hit point ratio or simply an above this value nothing can be gibbed type process.
Respawn frame. This identifies the sequence used when an archvile resurrects a monster. It usually shows the death pictures in reverse and then goes to the start of the walking sequence. Setting this to 0 will prevent an archvile resurrecting the monster concerned.
The bits box (bottom of the screen).

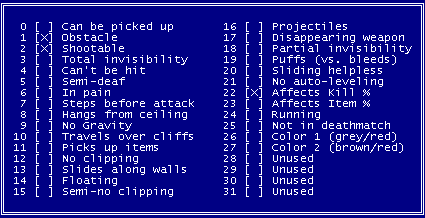
This is where you define the main properties of a thing that are either off or on. Simply highlight the one you want to change and hit enter. The BEX format includes a series of mnemonics that can be used in place of, or alongside the original bit settings. These will be discussed in the BEX section. I have used most of these bits at one time or another. I am a little unclear as to how some actually affect the thing concerned. The descriptions here are based on the dehacked documentation, the Boom documentation and my experience.
1 Can be picked up – When touched the thing can be picked up.
2 Obstacle – The thing is solid and will not let you (or others) pass through it
3 Shootable – Can be shot.
4 Total Invisibility – Invisible, but can be touched
5 Semi deaf – The thing is a deaf monster
6 In pain – Will try to attack right back after being hit
7 Steps before attack – Will take at least one step before attacking
8 Hangs from ceiling – When the level starts, this thing will be at ceiling height.
9 No gravity – Gravity does not affect this thing
10 Travels over cliffs – Monsters normally do not walk off ledges/steps they could not walk up. With this set they can walk off any height of cliff. Usually only used for flying monsters.
11 Pick up items – The thing can pick up gettable items.
12 No clipping - Thing can walk through walls.
13 Slides along walls – Keep info about sliding along walls (don’t really know much about this one).
14 Floating – Thing can move to any height
15 Semi no clipping – Don’t cross lines or look at teleport heights. (don’t really know much about this one either).
16 Projectiles – Behaves like a projectile, explodes when hitting something that blocks movement
17 Disappearing weapon – Dropped, not spawned (like an ammo clip) I have not had much success in using this one.
18 Partial invisibility – Drawn like a spectre.
19 Puffs (vs. bleeds) – If hit will spawn bullet puffs instead of blood splats.
20 Sliding helpless – Will slide down steps when dead.
21 No auto levelling - float but not to target height (?)
22 Affects kill % – counted as a killable enemy and affects percentage kills on level summary.
23 Affects item % –affects percentage items gathered on level summary.
24 Running - special handling for flying skulls.
25 Not in deathmatch - do not spawn in deathmatch (like keys)
26 Color 1 (grey / red)
27 Color 2 (brown / red)
26 and 27 allow the green colours in a thing’s graphics to be remapped to a different colour like the players uniforms in multiplayer games. Leaving all the bits alone, the thing stays green. Setting 26 it becomes grey. Setting 27 it becomes brown. Setting both 26 and 27 it becomes red.
28-31 are unused. Some source ports use them. Eg Doom Legacy can allocate slightly different translucency effects to a thing using these bits. Or at least it could a couple of years ago.